☰
◀ Previous △ Index Next ▶
F4.13} Layers
The Layers tab allows the user to create customized views. The
user has the possibility to change the fill color of the regions
displaying regions, materials or even color encoding of biasing,
cuts, thresholds etc. Moreover The user has the possibility to
overlay a background image e.g a technical drawing, project
USRBIN data, BEAM parameters, lattices, voxels, transformations
as well 3D representations using a raytracing technique. Or a
combination of any of the above.
 The buttons on the top allow the user to create, rename, clone or
delete a layer.
The buttons on the top allow the user to create, rename, clone or
delete a layer.
WARNING:
There are 4 predefined system layers:
Boundary
Media
3D
Lattice
where the user can only control the "Options".
The "Global" checkbox when ticked makes the layer common to all
projects. It saves the information in the flair.ini file rather
in the flair project
The listbox on the top allows:
- to access and modify the various options for each layer type
- to turn ON/OFF the visibility of the layer type
- Click on <add> or with the keyboard [Ins] to add a new layer
- Right-Click to remove the layer or with the keyboard [Del]
Buttons:
[Apply] Perform the changes and redraws the viewports.
Most of the actions are refreshed automatically.
[Reset] Reset current layer to the default parameters
[Help] Show the documentation page
The following layer types are available:
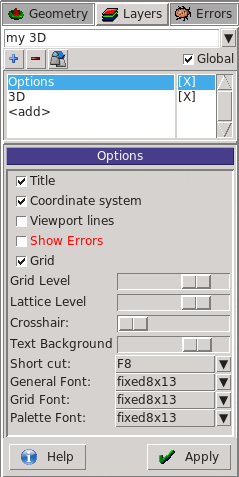
allows the user to modify the global options for ALL viewports and layers
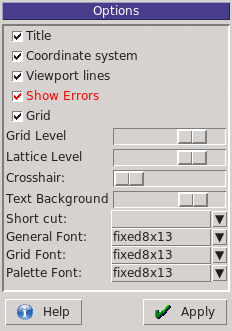 Title: Display the viewport title on the top-right corner
Coordinate System: Display the coordinate system on the bottom-left
Viewport lines: Display other viewports as dashed lines
Show Errors: Enable the error lines drawing. (As well the
error message)
Orientation Cube: Set size of the orientation/navigation cube.
Set to 0 to hide.
Grid: Display the grid
Grid Level: Opacity of the grid
Lattice Level: Opacity of the hashed lines when lattices are displayed
Crosshair: Display a cross hair in the center of the screen
Text Background: Opacity of the background color for all text
on screen
Shortcut: Select a shortcut for faster accessing of the layer
General Font: Font to use for all text
Grid Font: Font to use for displaying grid values
Palette Font: Font to use for displaying palette values
Color & text information to be displayed on the 2D plot
Title: Display the viewport title on the top-right corner
Coordinate System: Display the coordinate system on the bottom-left
Viewport lines: Display other viewports as dashed lines
Show Errors: Enable the error lines drawing. (As well the
error message)
Orientation Cube: Set size of the orientation/navigation cube.
Set to 0 to hide.
Grid: Display the grid
Grid Level: Opacity of the grid
Lattice Level: Opacity of the hashed lines when lattices are displayed
Crosshair: Display a cross hair in the center of the screen
Text Background: Opacity of the background color for all text
on screen
Shortcut: Select a shortcut for faster accessing of the layer
General Font: Font to use for all text
Grid Font: Font to use for displaying grid values
Palette Font: Font to use for displaying palette values
Color & text information to be displayed on the 2D plot
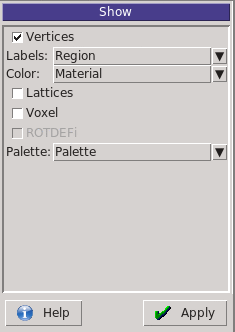 Vertices: Display the intersection vertices of body boundaries
Labels: Choose type of labels to display, None, Region,
Material or color Value
Color: Color to fill the regions. It can be any
random for the Region, predefined for the
Material and from a color palette (see
colorband) for any numerical value
Region random color
Material predefined material color
Material-Decay material for decay transport
Density material density
USRBIN USRBIN by region
Importance BIASING what(3) for all-particles
Importance-H BIASING what(3) for hadrons
Importance-E BIASING what(3) for emf particles
Importance-N BIASING what(3) for neutrons
Splitting BIASING what(2) for all-particles
Splitting-H BIASING what(2) for hadrons
Splitting-E BIASING what(2) for emf particles
Splitting-N BIASING what(2) for neutrons
Corrfactor CORRFACT what(2)
Corrfactor-dE/dx CORRFACT what(1)
Corrfactor-rho CORRFACT what(2) * MATERIAL.density
Deltaray DELTARAY
e-Production EMFCUT e production
e-Transport EMFCUT e transport
g-Production EMFCUT g production
g-Transport EMFCUT g transport
Lattices: Control lattice display
Off: do not display lattices
Show: show lattices when display is idle
Prompt: show lattices promptly. Can slow down the refreshing of
display
Voxel: Control voxels display
Off: do not display voxels
Show: show voxels when display is idle
Prompt: show voxels promptly. Can slow down the refreshing of
display
Palette: Select palette to display color information like
importances etc.
Display a background image e.g. a technical drawing of your object
properly aligned with the geometry
Vertices: Display the intersection vertices of body boundaries
Labels: Choose type of labels to display, None, Region,
Material or color Value
Color: Color to fill the regions. It can be any
random for the Region, predefined for the
Material and from a color palette (see
colorband) for any numerical value
Region random color
Material predefined material color
Material-Decay material for decay transport
Density material density
USRBIN USRBIN by region
Importance BIASING what(3) for all-particles
Importance-H BIASING what(3) for hadrons
Importance-E BIASING what(3) for emf particles
Importance-N BIASING what(3) for neutrons
Splitting BIASING what(2) for all-particles
Splitting-H BIASING what(2) for hadrons
Splitting-E BIASING what(2) for emf particles
Splitting-N BIASING what(2) for neutrons
Corrfactor CORRFACT what(2)
Corrfactor-dE/dx CORRFACT what(1)
Corrfactor-rho CORRFACT what(2) * MATERIAL.density
Deltaray DELTARAY
e-Production EMFCUT e production
e-Transport EMFCUT e transport
g-Production EMFCUT g production
g-Transport EMFCUT g transport
Lattices: Control lattice display
Off: do not display lattices
Show: show lattices when display is idle
Prompt: show lattices promptly. Can slow down the refreshing of
display
Voxel: Control voxels display
Off: do not display voxels
Show: show voxels when display is idle
Prompt: show voxels promptly. Can slow down the refreshing of
display
Palette: Select palette to display color information like
importances etc.
Display a background image e.g. a technical drawing of your object
properly aligned with the geometry
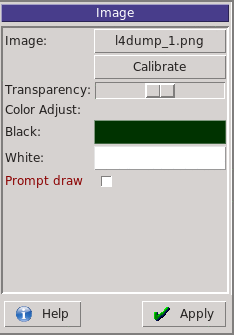 Image: Click to select the image to display
accepted formats png, gif, jpg, tif, bmp
Calibrate: Click to open the calibration dialog
Alpha: Select transparency/opacity level of the image
plot on the back the standard material colors
Color Adjust: Interpolate the colors with the black-white range
Black: color to use for the #000000 value
White: color to use for the #ffffff value
Prompt draw: Normally the image drawing is done when the display
is idle. Prompt will force to draw the image
immediately however rendering the display a bit
slow
Image: Click to select the image to display
accepted formats png, gif, jpg, tif, bmp
Calibrate: Click to open the calibration dialog
Alpha: Select transparency/opacity level of the image
plot on the back the standard material colors
Color Adjust: Interpolate the colors with the black-white range
Black: color to use for the #000000 value
White: color to use for the #ffffff value
Prompt draw: Normally the image drawing is done when the display
is idle. Prompt will force to draw the image
immediately however rendering the display a bit
slow
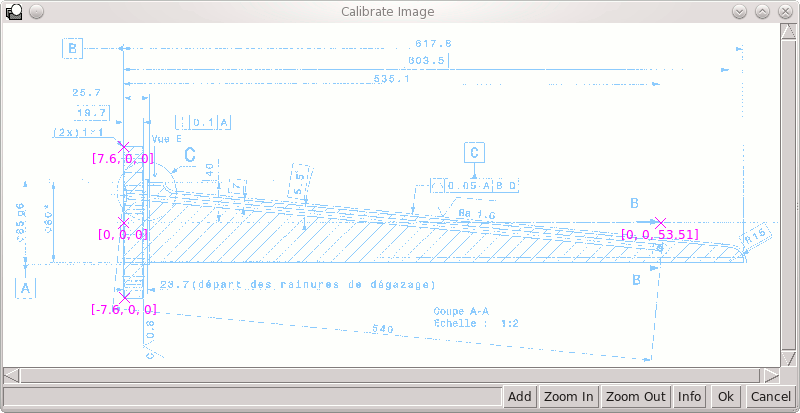 The calibration dialog needs at least 3 markers (the more the
better) to find the transformation from the image coordinates to
the geometry coordinates.
The calibration dialog needs at least 3 markers (the more the
better) to find the transformation from the image coordinates to
the geometry coordinates.
Note:
The markers should not fall all in the same line, otherwise
the program cannot calculate the transformation matrix
Add add a new marker any point in the image and enter the
Ctrl-Click the geometry (x,y,z) corresponding to this point
Right-Click on any point to insert a new marker, delete or
edit the coordinates of the marker
Zoom In or MouseWheel
Zoom Out
Info To dump to the output window the calibration error
Ok To close the window and accept the calibration
Cancel To close and forget the calibration
Once the image is properly calibrated then it will appear as a
background image in the viewport when the appropriate layer is
selected.
Note:
Please try to change the colors of your image in order to
make it easier visible on the screen
 Final image on the viewport window
Reads the default USERDUMP file and draws the particle
trajectories.
Final image on the viewport window
Reads the default USERDUMP file and draws the particle
trajectories.
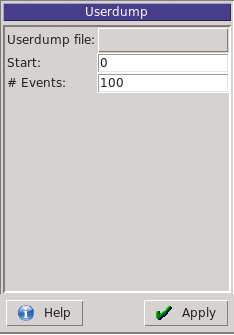 Userdump file: file to read
Start: Starting event
# Events: Number of events to plot
Listbox Select particle types to draw
as well their limits in energy and track color
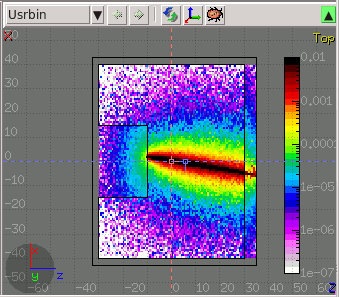
Display cuts of one or multiple USRBINs dynamically in the
geometry. Up to 20 usrbin can be loaded and displayed at the same
time. The layer index selects the parameters of the specific usrbin.
For each displayed pixel, the first USRBIN that includes the
displayed location is drawn. Therefore select the finer mesh
first and the coarser as last.
Userdump file: file to read
Start: Starting event
# Events: Number of events to plot
Listbox Select particle types to draw
as well their limits in energy and track color
Display cuts of one or multiple USRBINs dynamically in the
geometry. Up to 20 usrbin can be loaded and displayed at the same
time. The layer index selects the parameters of the specific usrbin.
For each displayed pixel, the first USRBIN that includes the
displayed location is drawn. Therefore select the finer mesh
first and the coarser as last.
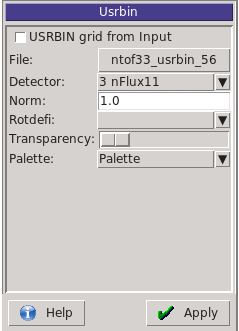 USRBIN from Inp Check if you want to display a USRBIN card
as a checker grid pattern.
Usrbin file: Load USRBIN file
Detector: Select detector to display from USRBIN file
Norm: Normalization constant to use
X-offset: Additional offset to apply to USRBIN
Y-offset: To get the offsets from Input select the
Z-offset "USRBIN from Inp" select the USRBIN
and then switch to file.
Rotdefi: Select a ROT-DEFI to be applied to the USRBIN
Transparency: Select transparency/opacity level of the usrbin
plot on top the standard material colors
Prompt Display promptly the usrbins.
WARNING can slow down display
Palette: Palette to use for this usrbin
USRBIN from Inp Check if you want to display a USRBIN card
as a checker grid pattern.
Usrbin file: Load USRBIN file
Detector: Select detector to display from USRBIN file
Norm: Normalization constant to use
X-offset: Additional offset to apply to USRBIN
Y-offset: To get the offsets from Input select the
Z-offset "USRBIN from Inp" select the USRBIN
and then switch to file.
Rotdefi: Select a ROT-DEFI to be applied to the USRBIN
Transparency: Select transparency/opacity level of the usrbin
plot on top the standard material colors
Prompt Display promptly the usrbins.
WARNING can slow down display
Palette: Palette to use for this usrbin
Note:
The color scale is not automatically selected you have to
define it using the Palette layer
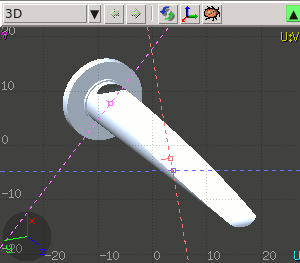
 Display 3D raytraced images behind the viewport. The usual cut
will be visible and all transparent object will be filled with
the ray-traced image behind.
Display 3D raytraced images behind the viewport. The usual cut
will be visible and all transparent object will be filled with
the ray-traced image behind.
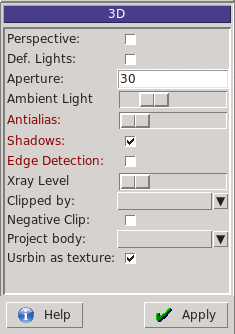 Perspective: Select orthographic (default) or perspective
projection
FOV: Field of View in degrees from 0 to 180.
It is enabled only in the perspective/combo mode.
Ambient Light: Amount of ambient light for dark regions
Antialias: Perform super sampling to enhance image
Perspective: Select orthographic (default) or perspective
projection
FOV: Field of View in degrees from 0 to 180.
It is enabled only in the perspective/combo mode.
Ambient Light: Amount of ambient light for dark regions
Antialias: Perform super sampling to enhance image
WARNING:
Can slow down considerably the
rendering
Shadows Enable if you want lights to cast shadows
WARNING:
Will slow down the rendering
Edge detection: Draw edges of regions as black lines.
WARNING:
Will slow down the rendering
Show errors: Check if you want to display errors as
red error lines.
Note:
if the [Show] layer is activated
also errors on the displayed projection
are also shown from that layer
Xray level: Set automatic transparency for each region
it finds emulating an xray image
Clipped by: Set a clipping body to clip the 3D image
Negative clip: Use the negative of the body
Project body: Use this body as a projection surface for
the USRBIN values. Useful if you want to
display fluences in vacuum or in transparent
objects.
Usrbin as texture: Use the USRBIN values as the surface
color texture on regions. If unselected
USRBINS will be displayed only on the
Projection body
 Select the color band limits, gradient and palette. To be used
in combination when showing numerical values, density, biasing,
thresholds etc or USRBIN data. Up to 3 different palettes can
be used. For example a gray-scale one for plotting densities and
a color one for overlaying USRBIN values.
Select the color band limits, gradient and palette. To be used
in combination when showing numerical values, density, biasing,
thresholds etc or USRBIN data. Up to 3 different palettes can
be used. For example a gray-scale one for plotting densities and
a color one for overlaying USRBIN values.
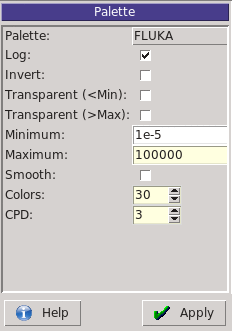 Palette: Select the Palette type to use. There are several
predefined palettes however the user can create its
own.
Log: Logarithmic or linear scale
Invert: Reverse palette order
Transparent(<Min):If selected do not paint anything for values
smaller than the palette minimum
If not selected all values<Min will be painted
with the minimum color
Transparent(>Max):If selected do not paint anything for values
greater than the palette maximum.
If not selected all values>Max will be painted
with the maximum color
Minimum: Minimum value of the color band
Maximum: Maximum value of the color band
Colors: Number of colors to be interpolated
CPD: Colors per decade. Active when the "Log" option
is selected. When modified the Maximum value
is calculated as a function from the minimum
and the number of colors, to ensure correct
rounding of colors per decade.
Palette: Select the Palette type to use. There are several
predefined palettes however the user can create its
own.
Log: Logarithmic or linear scale
Invert: Reverse palette order
Transparent(<Min):If selected do not paint anything for values
smaller than the palette minimum
If not selected all values<Min will be painted
with the minimum color
Transparent(>Max):If selected do not paint anything for values
greater than the palette maximum.
If not selected all values>Max will be painted
with the maximum color
Minimum: Minimum value of the color band
Maximum: Maximum value of the color band
Colors: Number of colors to be interpolated
CPD: Colors per decade. Active when the "Log" option
is selected. When modified the Maximum value
is calculated as a function from the minimum
and the number of colors, to ensure correct
rounding of colors per decade.
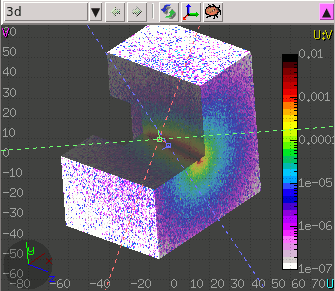 A combination of the 3D, USRBIN and Colorband
Select and display ROI (Regions of Interest) embedded in the voxel file.
ROI Colors: Control the blending of ROI colors and displayed values
Listbox Select ROIS to be displayed/filtered
A combination of the 3D, USRBIN and Colorband
Select and display ROI (Regions of Interest) embedded in the voxel file.
ROI Colors: Control the blending of ROI colors and displayed values
Listbox Select ROIS to be displayed/filtered
◀ Previous △ Index Next ▶
 flair
flair